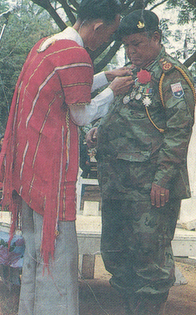
Wednesday, September 30, 2009

လြယ္ကူသုံး၀င္ဗီဒီယို ျဖတ္ကူးေရးလုပ္ရေအာင္


Free Video Cutter(Freeware)

ဒီေဆာ့ဒ္၀ဲေလးကသင့္ရဲဗီဒီယိုဖိုင္မ်ားကိုျဖတ္ျခင္း၊ဆက္ျခင္း၊အရြယ္အစားေသးငယ္ေအာင္ခ်ဳံျခင္းမ်ားကို
ျပဳလုပ္ႏိုင္ေသာfreewareေလးပါ။
ဒီေဆာ့ဒ္၀ဲေလးကို“videocutter”,“videosplitter”သို႔မဟုတ္“videoclipper”မ်ားအေနန႔ဲအသုံးျပဳႏိုင္ပါတယ္။ေနာက္ျပီး ဒီပရုိဂရမ္ကေန သင့္ရဲ ဗီဒီယိုဖိုင္မ်ားရဲ ့ Formatsကို MPEG 1/2, MPEG4, DivX, Xvid, AVI, WMV, Quicktime MOV,Flashvideoဖိုင္မ်ားအျဖစ္ေျပာင္းလဲေပးႏိုင္ပါသည္။အထူးအေထြဘာမွလုပ္စရာမလိုအပ္ဘဲ လြယ္ကူရိုးရွင္းစြာအသုံးျပဳႏိုင္ျပီး အရည္အေသြးေကာင္းေသာဗီဒီယိုမ်ားကိုသင္ျမင္ေတြခံစားႏိုင္ပါသည္။
အသုံးျပဳႏိုင္ေသာဗီဒီယိုFormatမ်ားမွာ-

* MPEG4
* DivX
* WMV (Windows Media Video)
* Quicktime MOV
* Flash Video (*.flv)
* MP3 (only audio)

ဒီထက္ပို၍ ေလ့လာလိုလွ်င္သူ႔Website ေလးမွာ www.freevideocutter.com
ဒီေနရာမွ ယူပါ(3.1MB)

ဆက္ဖတ္ရန္က်န္ေသးသည္...

Visual Task Tips

http://s456.photobucket.com/albums/qq281/ywarthar/visual_task_tips.jpg

VisualTaskTips ေဆာ့၀ဲေလးပါ ပုံမွာၿပထားတဲ့အတုိင္း tab bar ကုိေထာက္လုိက္တာနဲ႔ ဘာဖြင့္ထားလဲ ဆုိတာကို သိႏုိင္ပါတယ္။ ကဲေဆာ့၀ဲေလး ဒီမွာ ပါ။

ဆက္ဖတ္ရန္က်န္ေသးသည္...

Icon လွလွေလးေတြနဲ႔ အလွဆင္


မိမိရဲ႕ ကြန္ပ်ဴတာမွာ ရွိတဲ့ Folder ေတြရဲ႕ ပံုစံေတြက ေတာ္ေတာ္ကုိ တံုးေနပါၿပီ။ ဒီေတာ့ Folder ေလးေတြကုိ အျမင္တင့္တယ္ၿပီး အမ်ားသေဘာေတြ႕ေစဖုိ႔ icon ေလးေတြကုိ ဒီ၀က္ဆုိက္က ယူႏုိင္ပါတယ္။ Vista icon ကုိ ယူမလား၊ Cartoon icon ကုိ ယူမလား၊ Computer icon ကုိ ယူမလား၊ Desktop icon ကုိ ယူမလား လွပတဲ့ Icon မ်ဳိးစံုကုိ ရယူႏုိင္ပါတယ္။ ၀က္ဆုိက္ကို (ဒီမွာႏွိပ္) ၿပီးသြားေရာက္ ေလ့လာႏုိင္ပါတယ္။

ဆက္ဖတ္ရန္က်န္ေသးသည္...

Tuesday, September 29, 2009

Open With ျပႆနာ

မိမိတုိ႔ရဲ႕ ကြန္ပ်ဴတာမွာ ျဖစ္တတ္တဲ့ ျပႆနာတစ္ရပ္ကုိ ေဖာ္ျပေပးလုိက္ပါတယ္။ My Computer ထဲက Local Disk (C:) တုိ႔ (D:) တုိ႔ ဖြင့္တဲ့အခါ Open မျဖစ္ပဲ Open With Box ေပၚတဲ့ စက္ေတြအတြက္ ေျဖရွင္းရမယ့္ နည္းလမ္းေလးေတြပါ။ ေအက္က ျပထားတဲ့ ပံုလုိ ျဖစ္ခဲ့ရင္ေပါ့။


ဒီလုိ ျပဳလုပ္ရပါလိမ့္မယ္။

၁) Start မွ Run ။ ၿပီးရင္ cmd ကုိ ႐ုိက္ဖြင့္ပါ။
၂) cmd box ေပၚလာလွ်င္ cd\ ကုိ ႐ုိက္ၿပီး enter ေခါက္ပါ။
၃) attrib -r -h -s autorun.inf ကုိ ႐ုိက္ၿပီး enter ေခါက္ပါ။
၄) del autorun.inf ကုိ ႐ုိက္ၿပီး enter ေခါက္ပါ။ Yes or No ေမးခြန္းတြင္ Y ကုိ ႏွိပ္လုိက္ပါ။
၅) ၿပီးလွ်င္ d: ကုိ ႐ုိက္၍ enter ေခါက္ပါ။ ၿပီးလွ်င္ အဆင့္(၃)ႏွင့္ (၄)တြင္ လုပ္ခဲ့သည့္အတုိင္း ျပန္လုပ္ပါ။
(အကယ္၍ Local Disk သည္ (C:) (D:) (E:) တုိ႔ ရွိခဲ့လွ်င္ အထက္က ျပသည့္နည္းအတုိင္း ျပဳလုပ္ပါ။ d: ေနရာတြင္ e: ကုိ ျပဳလုပ္သြားရမည္ ျဖစ္သည္။)
၆) Restart ျပဳလုပ္ပါ။

ဆက္ဖတ္ရန္က်န္ေသးသည္...

Photo Frame Show Software


ဓါတ္ပံုေဘာင္လွလွေလးေတြထဲမွာ မိမိတုိ႔ရဲ႕ ပံုေတြ ထည့္ဖုိ႔အတြက္ ေဆာ့၀ဲလ္ေကာင္းေလးကုိ ေဖာ္ျပေပး လုိက္ပါတယ္။ အၿမဲတမ္းသံုးႏုိင္ရန္ A Code ဖုိင္ေလး ထည့္ေပးထားပါတယ္။

Install လုပ္ၿပီးရင္ အရင္ဦးစြာ C: ထဲက Program File ဆုိတာ ရွိပါတယ္။ အဲဒီမွာ FrameShow ဆုိတဲ့ ဖုိဒါရွိေနမွာပါ။ အဲဒီဖုိဒါထဲကုိ Crack File ေလးကုိ Copy ယူၿပီး ထည့္လုိက္ပါ။ ေရာက္သြားရင္ အဲဒီဖုိင္ကုိ Run လုိက္ပါ။ Activation Code ျဖည့္ရမွာ ျဖစ္ပါတယ္။ User Name ကုိေတာ့ မိမိတုိ႔ ႏွစ္သက္ရာ ေပးပါ။ AC ကုိေတာ့ A Code natepad ဖုိင္ေလးထဲမွာ ရွိပါတယ္။ ေဆာ့၀ဲလ္ကုိ ဒီမွာ Download လုပ္ယူပါ။ အဆင္ေျပပါေစ။

ဆက္ဖတ္ရန္က်န္ေသးသည္...

Task Manager အလြယ္ဖြင့္နည္း


Virus ကုိက္လုိက္တဲ့အခါက်ရင္ Regedit ေရာ၊ Task Manager ေရာ Folder Option ေတြေရာ ပိတ္ပစ္လုိက္တာ မထူးဆန္းတဲ့ ကိစၥတစ္ခုလုိ ျဖစ္ေနပါၿပီ။ မိမိ ဘေလာ့မွာ Regedit အလြယ္ဖြင့္နည္းကုိ ေဖာ္ျပၿပီး ျဖစ္ပါတယ္။ နည္းပညာဘေလာ့တုိင္းမွာလဲ ေဖာ္ျပေနၾကပါတယ္။ ဒါေၾကာင့္ မိမိလဲ ဒါေတြကေတာ့ လူတုိင္း သိၿပီးသားပါ မေဖာ္ျပေတာ့ပါဘူး ေနခဲ့တာပါပဲ။ တကယ္တမ္း လုိအပ္သူေတြက ေမးလာေတာ့ ေရးသား ေဖာ္ျပေပးလုိက္ပါတယ္။

Task Manager အလြယ္ဖြင့္နည္းပါ။ ေအာက္ကအတုိင္း ျပဳလုပ္ပါ။

၁) အရင္ဦးစြာ Start မွ Run box တြင္ gpedit.msc လုိ႔႐ုိက္ပါ။
၂) Box က်လာလွ်င္ User configuration ေအာက္ရွိ Administrative Templates ဆုိတာ ရွိပါတယ္။
၃) အဲဒါက ကလစ္ၿပီး System ၊ ၿပီးရင္ Ctrl + Alt + Del option ကုိ ကလစ္ပါ။
၄) ညာဘက္တြင္ Remove Task Manager ရွိပါတယ္။
၅) အဲဒါကုိ Double Click လုပ္လုိက္ပါ။
၆) Box တစ္ခုက်လာလွ်င္ Enable ကုိ ေရြးပါ။ ၿပီးလွ်င္ Apply ။
၇) အကယ္၍ ဖြင့္မရေသးပါက Disable ကုိ ေရြးၿပီး Apply ။
၈) Ok ။

ဆက္ဖတ္ရန္က်န္ေသးသည္...

SuperRam Software


မိမိတုိ႔ရဲ႕ ကြန္ပ်ဴတာ Memory ေတြ ျမန္ဆန္ေအာင္ ေဆာင္ရြက္ေပးမယ့္ SuperRam ေလး ေဖာ္ျပေပး လုိက္ပါတယ္။ မိမိ ကြန္ပ်ဴတာ သံုးေနစဥ္အတြင္းမွာလဲ Memory ကုိ ဘယ္ေလာက္ အသံုးျပဳေနတယ္ ဆုိတာေတြကုိ ေဖာ္ျပေပးေနပါတယ္။ Memory ရဲ႕ စံကုိလဲ စမ္းသပ္လုိ႔ ရပါတယ္။ စိတ္၀င္စားသူမ်ား Download လုပ္ယူပါ။

ဆက္ဖတ္ရန္က်န္ေသးသည္...

Pdf to Word Converter


PDF ကေန Word ကုိ ေျပာင္းလဲတဲ့ ေဆာ့၀ဲလ္ လုိလုိ႔ လုိက္ရွာေနတာ တစ္ခုမွ အဆင္ေျပေျပ မေတြ႕ပါဘူး။ ဒီေန႔ေတာ့ Pdf to Word ေဆာ့၀ဲလ္တစ္ခု ရခဲ့တယ္။ သံုးေတာ့ မၾကည့္ရေသးဘူး။ အဆင္ေျပႏုိင္ေကာင္းပါရဲ႕။ စာဖတ္သူေတြလဲ လုိအပ္မယ္ဆုိရင္ Download ယူလုိက္ပါ။

ဖုိင္က Password ေပးထားပါတယ္။ အဲဒါကေတာ့ waz-warez.org ပါ။ Keygen file ေတာ့ ထည့္ေပးထားပါတယ္။ အဲဒီဖုိင္ကုိ ဖြင့္မရခဲ့ရင္ ဒီ 658812724157V7317176 ကုိ ယူသံုးလုိက္ပါ။ Email ဆုိတဲ့ အကြက္မွာေတာ့ မိမိတုိ႔ ႏွစ္သက္ရာ ေမးလ္တစ္ခုကုိ ျဖည့္လုိက္ပါ။ အဆင္ေျပပါေစ။

ဆက္ဖတ္ရန္က်န္ေသးသည္...

Battery Doubler Software


ထူးထူးဆန္းဆန္းလုိ႔ ေျပာရမလားပဲ။ မိမိအေနနဲ႔ကေတာ့ ယံုသလုိလို မယံုသလုိလုိပါပဲ။ ဒီေဆာ့၀ဲလ္က ေကာင္းမေကာင္းေတာ့ ေသခ်ာမသိဘူး။ အေၾကာင္းကေတာ့ သူက laptop ေတြမွာ သံုးတာဆုိေတာ့ေလ။ ဒီေဆာ့၀ဲလ္ကုိ ၫႊန္းထားတာေတာ့ Laptop ရဲ႕ Battery ကုိ ႏွစ္ဆ တုိးေစတယ္ ဆုိထားတယ္။

နာမည္ကုိလဲ ၾကည့္လုိက္အံုးေလ။ Battery Doubler ဆုိပဲ။ ၫႊန္းထားတာေတြကေတာ့ မ်ားသား။ ကဲပါေလ Laptop ကြန္ပ်ဴတာ ရွိတဲ့ သူေတြအတြက္ အသံုး၀င္ႏုိင္ ေကာင္းပါရဲ႕။ စမ္းသံုးၾကည့္ၾကေပါ့။ ဆုိက္ကေတာ့ ေသးငယ္ပါတယ္။ ဒီမွာ Download လုပ္ယူပါ။

ဆက္ဖတ္ရန္က်န္ေသးသည္...

Wednesday, September 23, 2009

All Video to VCD DVD


လုိအပ္မည့္သူမ်ားအတြက္ All Video to VCD SVCD DVD Creator & Burner 4.2 ေလး ေဖာ္ျပေပးလုိက္ပါတယ္။ ဒီေဆာ့၀ဲလ္က ဘာေတြသံုးလုိ႔ရလဲ ဆုိတာကေတာ့ ျမင္တာနဲ႔ သိသာပါတယ္။ ဒီမွာ Download လုပ္ယူပါ။

ဆက္ဖတ္ရန္က်န္ေသးသည္...

Tuesday, September 15, 2009

How to Set Computer Name and Workgroup in Windows XP


It’s better for you to set computer name and workgroup in Microsoft Windows network in order to identify the computers easier.


Computer name is used to identify your computer in Windows network. It’s especially useful to be used for file sharing.

Each computer must belong to a workgroup also. A workgroup is a group of computers on your network that share common resources. Default workgroup in Windows XP is WORKGROUP.

Follow the instructions here to set computer name and workgroup.

1)Go to Start and right click on My Computer. Click Properties.

2) System Properties window will appear. Select Computer Name tab and click Change to change computer name and workgroup. You can key in computer description as an option also.

3) In this Computer Name Changes window, key in Computer Name and also Workgroup. The Computer name I entered is David and workgroup is HOME. Click OK at last.

Note: Please make sure computer name is unique in your network, not more then 15 characters and avoid from using this characters for naming your computer name: * “ . , @ /

4) System will prompt you to restart computer. Click OK and restart your computer for the changes to take effect.

5) After computer is restarted, go to System Properties window again and you will see the computer name David and Workgroup HOME. You have successfully set computer name and workgroup, also check out file sharing in Windows XP


ဆက္ဖတ္ရန္က်န္ေသးသည္...

How to password protect a shared folder and file


If your looking to password protect a shared folder on your network, you've probably noticed that Windows XP doesn't have any built in features allowing you to lock access to a folder via a password like previous Windows releases did. This means that anyone using the same workgroup or domain can access the files within your shared folder.

The good news is that there is a work around that seems to do the trick and simply involves creating a password for the guest account. Since shared folders are accessed on the network using the guest account, once the password for the guest account is set, a user in your workgroup or network domain must supply a valid username and password for the guest account to access the shared folder and contents within.

Password protecting a shared network folder:

  1. Log into Windows XP as an Administrator
  2. Click Start -> Control Panel -> User Accounts, then click on Guest Account and make sure it is turned on
  3. Now Click Start -> Run, type cmd in the entry box, and click Ok
  4. At the command prompt, type Net user guest password and press Enter
  5. Again, Click Start -> Control Panel -> User Accounts, then click on Guest Account
    Notice that you can now set a password on the Guest Account. Set a Password and restart your Computer.
  6. Now, when a person tires to access your shared folder, they will be prompted for a username and password to continue. Use the username "Guest" and "password" you have set to access the password protected shared folders from your network

ဆက္ဖတ္ရန္က်န္ေသးသည္...

Setup Small Office Network


Step 1

Confirm all computers have network adaptors and run XP (preferably).

It is necessary for all the computers that will be part of the network to have working network adaptors – can be LAN or WLAN card. At the time of this writing, Windows XP is the preferred operating system for all networked computers to use because: 1. Microsoft no longer supports older Windows OPs such as 98, ME, and 2000, so they are no longer considered secure; 2. Windows Vista is still considered “buggy” or complicated to use and will use a different process for connecting to the network.

Step 2

Purchase Materials

The following list of materials may be necessary for creating the network:

  1. Switch (preferable to hub and router because of the performance and ease of setup, respectively)
  2. “Category 5” Ethernet Cables – used to connect from the switch to networked computers
  3. Fasteners – to secure the Ethernet cables to walls, floor, ceilings as necessary.
  4. Security Software – An security package that includes anti-virus, malicious-software detection and removal, firewall and routine definitions updates.

Step 3

Install Software

Install the security software on the primary network machine and other computers that will connected to the network, hereafter called Fileserver. Ensure to update the software and definitions.

Step 4

Connect router to switch and switch to Fileserver

Connect Ethernet cable (#1) between router which provides the Internet connection and the switch. Then connect Ethernet cable #2 from the switch to the Fileserver. Test for Internet connectivity. This will ensure that the switch, cables and network card all work properly.

Step 5

Create a workgroup on the Fileserver

Use the Network Setup Wizard to create the primary workgroup that all the other network computers will connect to. One way to find the Network Setup Wizard is via the Control Panel. During the wizard setup, be sure to select the proper Network Connection you are using and most importantly give the Workgroup an accessible name (for example, BI). You will use the same Workgroup name when setting up all the other computers on the network.

Step 6

Create a shared folder on the Fileserver

You can create a new folder anywhere on the fileserver. Then right click and select Sharing to open the Sharing options or right click and select Properties and click on the Sharing tab. Tick the checkbox so that filesharing is enabled. Once that is ticked, any folder you put inside this one will also be shared and so you will create a folder tree inside this folder, as you see fit, that will be shared across the network.

Step 7

Connect Test Computer #1 to switch

Connect Ethernet cable #3 between the switch and Test Computer #1. Make sure you have Internet connectivity. This will ensure that the connection to the switch is behaving as expected.

Step 8

Create connection between Test Computer #1 and Fileserver

Use the Network Wizard Setup to create the connection to the Fileserver. Most importantly, name your workgroup the same name as used for the Fileserver workgroup (for example, BI). Open My Network Places and click on View workgroup computers. Ensure that you can connect to the shared folder on the BI workgroup. Try creating a new file, copying a file, changing the contents of the file, creating a new directory, etc. to ensure you have permissions on the network.

Step 9

Repeat Step 8 as necessary for each computer you want on the network

ဆက္ဖတ္ရန္က်န္ေသးသည္...

IDM 5.18 Version


အားလံုးရဲ႕ အသည္းေက်ာ္ႀကီး IDM 5.18 Version ကုိ ေဖာ္ျပေပးလုိက္ပါတယ္။ အၿမဲတမ္းသံုးလုိ႔ရတဲ့ Patch file ပါ ထည့္သြင္းေပးထားပါတယ္။ ဒီမွာ Download လုပ္ယူပါ။ အားလံုးအဆင္ေျပပါေစ။

ဆက္ဖတ္ရန္က်န္ေသးသည္...

Sunday, September 13, 2009

wwigo - Use your phone as wireless webcam


ႀကိဳးမဲ႔ စနစ္ေတြ တြင္က်ယ္လာတာနဲ႔အမွ် ပစၥည္းတစ္မ်ိဳးထဲနဲ႔ အလုပ္ေပါင္းမ်ားစြာ လုပ္ႏိုင္ေအာင္ ႀကံဆလာၾကတယ္။ အခုလည္း Bluetooth ပါတဲ႔ ကြန္ပ်ဴတာ (laptop သို႔မဟုတ္ bluetooth usb သံုးထားတဲ႔ ကြန္ပ်ဴတာ) ကိုသာ ပိုင္ဆိုင္ထားမယ္ဆိုရင္ ကလိလို႔ရတာေတြ အမ်ားႀကီးပဲ။ Bluetooth ပါတဲ႔ Handset ေလးကို remote control အျဖစ္သံုးမလား၊ webcam အျဖစ္သံုးမလား ရႏိုင္တယ္ေလ။ အခုေပးမွာက bluetooth စနစ္ကို သံုးၿပီး မိမိ ဖုန္းကို ကြန္ပ်ဴတာမွာ webcam အျဖစ္သံုးႏိုင္ေအာင္ပါ။ စမ္းသပ္ဖို႔ စိတ္၀င္စားၾကမယ္လို႔ ထင္ပါတယ္။ အခြင္႔အေရးမရိွေသးတဲ႔ လူေတြကလည္း ဗဟုသုတ ေပါ႔ဗ်ာ ... အသံုးျပဳနည္းကိုေတာ႔ ေျပာျပတာထက္ ပိုလြယ္ေအာင္ Video training ပံုစံနဲ႔ လုပ္ျပထားပါတယ္။ ေဒါင္းလုပ္ဖိုင္ ထဲမွာ တခါထဲ ထည္႔ေပးထားပါတယ္။


Download From Mediafire (wwigo)

Download From ifile (wwigo)

ဒီေကာင္႔ကို install မလုပ္ခင္ ကြန္ပ်ဴတာနဲ႔ ဖုန္းကို bluetooth ကြန္ယက္မိေအာင္ အရင္ဆံုး ခ်ိတ္လိုက္ပါ။ ၿပီးမွ Install လုပ္ၾကည္႔ပါ။ ပိုအဆင္ေျပပါလိမ္႔မယ္။

ဆက္ဖတ္ရန္က်န္ေသးသည္...

Network

BlackGhost နဲ႔ york တို႔ Cbox မွာ ေအာ္ထားလို႔ လုပ္နည္းေလးတစ္ခုကို
ေဖာ္ျပေပးလိုက္ပါတယ္။ Network နဲ႔ မရင္းႏီွးေသးသူေတြအတြက္ေတာ့ အိမ္သံုး၊
႐ံုးသံုး ကြန္ရက္ လက္ေတြ႕တည္ေဆာက္ျခင္းဆိုတဲ့ စာအုပ္ေလးေရးၿပီးေတာ့မွပဲ
လက္ေဆာင္ေပးေတာ့မယ္။
ကိုယ့္ Network အတြင္းမွာရိွတဲ့ တျခားကြန္ပ်ဴတာေတြကို
ထိန္းခ်ဳပ္တဲ့နည္းေတြ ေျမာက္ျမားစြာ ရိွပါတယ္။
တျခားကြန္ပ်ဴတာဘာလုပ္ေနတာကအစ ထိုင္ၾကည့္လို႔ရတဲ့ Program ေတြလည္း
ေျမာက္ျမားစြာရိွပါတယ္။ Local Chat (Text, Voice) ၊ Local Mail၊ Local
Intranet စတာေတြလည္း ဖန္တီးလို႔ ရပါေသးတယ္။ ေနာက္ပိုင္းမွာ
တစ္ခုခ်င္းေရးတင္သြားပါ့မယ္။ (ေနာက္မွေတြမ်ားေနၿပီနဲ႔တူတယ္)
အခုေတာ့ တျခားကြန္ပ်ဴတာေတြမွာ သံုးေနတဲ့ Program ေတြကို
လွမ္းပိတ္တဲ့နည္းေလး တင္လိုက္ပါတယ္။ တစ္ခုေလာက္ေတာင္းဆိုခ်င္တာက
ဒီနည္းလမ္းကို အသံုးခ်ၿပီး သူတစ္ပါးကို အေႏွာင့္အယွက္မေပးပါနဲ႔။
အထူးေတာင္းဆိုလိုပါတယ္။
၁။ ပထမဆံုး Command Prompt ထဲ ၀င္လုိက္ပါ။
၂။ တျခားကြန္ပ်ဴတာမွာ run ေနတဲ့ Program list ကို ၾကည့္ႏိုင္ဖို႔
tasklist command ကို သံုးရပါ့မယ္။ Parameter ေတြ ခံရပါမယ္။ tasklist /s
computername လို႔ ႐ိုက္ပါ။ computername ေနရာမွာ ကိုယ္ဆက္သြယ္မယ့္
ကြန္ပ်ဴတာရဲ႕ name ကို ထည့္ရပါမယ္။
၃။ ဒါဆိုရင္ အဲဒီ ကြန္ပ်ဴတာမွာ run ေနတဲ့ program list ေတြ ေပၚလာပါၿပီ။
၄။ လွမ္းပိတ္ႏိုင္ဖို႔အတြက္ taskkill command ကို ထပ္သံုးရပါ့မယ္။
၅။ taskkill /s computername /im programname ပါ။
၆။ programname ေနရာမွာ ပိတ္ခ်င္တဲ့ program name ကို ႐ိုက္ရပါမယ္။ ဥပမာ
notepad.exe

ခဏေလာက္ ေစာင့္ၾကည့္ပါ။ ၿပီးရင္ အဲဒီကြန္ပ်ဴတာ ကိုင္တဲ့သူ ငါ့ကြန္ပ်ဴတာ
ဘာျဖစ္သြားတာပါလိမ့္ဆိုတဲ့ မ်က္ႏွာႀကီးကို စပ္ၿဖီးၿဖီးနဲ႔
ၾကည့္ေနလိုက္ေပါ့။


ဆက္ဖတ္ရန္က်န္ေသးသည္...

New Utilities For Backup Drivers

ဟိုးတစ္ခါက Driver ေတြကို Backup လုပ္ႏိုင္ဖို႔ Driver Genius အေၾကာင္းကို ေရးခဲ့ဖူးပါတယ္။ အဲဒီဟာက Free မရတဲ့အတြက္ ကၽြန္ေတာ့္ဆီကို crack ေတာင္းတဲ့ Mail ေတြလည္း ေတာ္ေတာ္မ်ားမ်ား ၀င္လာပါတယ္။ တကယ္ေတာ့လည္း အဲဒီ့ Crack ေတြ ျဖည္ေနရတာ အေတာ္အလုပ္ရႈပ္ပါတယ္။ အဲဒါနဲ႔ Softpedia မွာ Free ရတဲ့ဟာေလးမ်ား ရွိမလားလို႔ လိုက္ရွာရင္း Chily Device Driver Backup ဆိုတဲ့ Tools ေလးတစ္ခုကို ေတြ႕လိုက္တာမို႔ Download Link ေလးကို ရွယ္ယာေပးလိုက္ပါၿပီ။ Driver ေတြကို Backup လုပ္ႏိုင္၊ Restore လုပ္ႏိုင္ပါတယ္။ Uninstall လည္း လုပ္ႏိုင္ပါေသးတယ္။

http://www.softpedia.com/progDownload/Device-Driver-Backup-Download-86809.html


ဆက္ဖတ္ရန္က်န္ေသးသည္...

Use Trial Program Always in your Computer

ကြၽန္ေတာ္တို႔ေတြ Program ေတြသံုးတဲ့အခါ Trail Version ေတြကို အမ်ားအားျဖင့္ သံုးၾကရပါတယ္။ Trial ကာလ ၁ လ ေပးတာတို႔ ၊ ၁၀ ရက္ ေပးတာတို႔မ်ိဳးေပါ့။ ၁၀ ရက္ Trial version ဆိုရင္ ၁၀ ရက္ျပည့္တဲ့အခါ Your Trial Version is Expire ဆိုၿပီး သံုးမရေတာ့ဘူးေလ။ အဲဒီလို Expire မျဖစ္ရေအာင္ လုပ္နည္းေလးပါ။ အရင္တုန္းကေတာ့ program expire မျဖစ္ခင္ computer date ကို ေရွ႕ျပန္တိုးေပးလိုက္ရင္ အဆင္ေျပသြားပါတယ္။ အခုေတာ့ RunAsDate ဆိုတဲ့ Program ေလးကို ေတြ႕လိုက္ပါတယ္။ ဥပမာ- Program တစ္ခုကို ၂၀၀၈ ၁ လပိုင္း ၁ ရက္ေန႔မွာ install လုပ္မယ္၊ သူ႔ရဲ႕ Trial ကာလက ၁၀ရက္ေပးတယ္ဆိုရင္ အဲဒီ Program ဟာ ၂၀၀၈ ၁ လပိုင္း ၁၁ ရက္ေန႔ေရာက္ရင္ သံုးရမွာမဟုတ္ေတာ့ပါဘူး။ ဒါေၾကာင့္ အဲဒီ Trial Program ကို RunAsDate ဆိုတဲ့ Program ကေနတစ္ဆင့္ ၂၀၀၈ ၁လပိုင္း ၁ရက္ေန႔အေနနဲ႔ပဲ အၿမဲ run ခိုင္းၿပီး သံုးမယ္ဆိုရင္္ ဘယ္ေတာ့မွ expire ျဖစ္မွာ မဟုတ္ေတာ့ပါဘူး။ တကယ့္အသံုး၀င္တဲ့နည္းေလးမို႔ တင္ေပးလိုက္ရျခင္းျဖစ္ပါတယ္။

RunAsDate Program အတြက္ Download Link ကေတာ့
http://zawthureintun.googlepages.com/runasdate.zip ျဖစ္ပါတယ္။

ဆက္ဖတ္ရန္က်န္ေသးသည္...

Thursday, September 10, 2009

Make your Personal Home Page

သင္လဲ ကုိယ္ပုိင္ Search engine home page ကုိ ပုိင္ဆုိင္ႏုိင္ပါတယ္။ အင္တာနက္ စတင္အသံုးျပဳမယ္ ဆုိၿပီး IE ကုိ ဖြင့္လုိက္ရင္ Google home page ေတြ႕ရမွာ ျဖစ္ပါတယ္။ အဲဒီ Google home Page ရဲ႕ ေနရာမွာ မိမိ ႀကိဳက္ႏွစ္ သက္ရာ အမည္ေလးမ်ားကုိ ေပးႏုိင္ပါတယ္။ အင္တာနက္ ဖြင့္တယ္ဆုိရင္ပဲ မိမိ ေပးထားတဲ့ အမည္ေလး ေတြကုိ ေတြ႕ၿပီး ေပ်ာ္ရႊင္ခံစား ႏုိင္ၾကပါေစ။ ၀က္ဆုိက္ကုိ ဒီကေန သြားေရာက္ႏုိင္ပါတယ္။

ဆက္ဖတ္ရန္က်န္ေသးသည္...

Wednesday, September 9, 2009

GTalk မွာ Webcam နဲ.စကားေၿပာႏူိင္ၿပီ


Googleကေတာ့ထပ္လုပ္ခ်ၿပန္ၿပီ။Gmail မွာVideo ရတုန္းကေတာ့သုံးရတာအဆင္မေၿပဘူး။
လုပ္ရတာရုွပ္တယ္။အခုေရလည္မိုက္တယ္။Gmail မွာသုံးရတာအဆင္မေၿပတဲ့လူအတြက္
Gtalk ကေနသုံးလို.ရေနပါၿပီ။ဒါေပမယ့္မိမိသုံးေနက် Gtalk Software နဲ.သုံးလို.မရပါဘူး။
Video GTalk Software ကိုေပးထာတဲ့ Website မွာ Download ဆြဲရပါလိမ့္မယ္။
Website ရဲ. Link ကိိုေတာ့ေအာင္မွာေပးထာပါတယ္။အသံလဲၾကည္တယ္။
ရုပ္လဲၿပတ္သားတယ္(ဟဲ...ဟဲ Connection ေကာင္းရင္ေၿပာတာေနာ္)။
Vzo Chat ကိုသုံးေနတဲ့လူေတြအတြက္သတင္းေကာင္းပါ။

Link : ဒီေနရာမွကလစ္နွိပ္ၿပီး Download လုပ္ပါ။

ဆက္ဖတ္ရန္က်န္ေသးသည္...

အယ္ဖိုး © 2008 Template by:
SkinCorner